by Jeffrey Putney | Apr 28, 2015 | Fab Academy
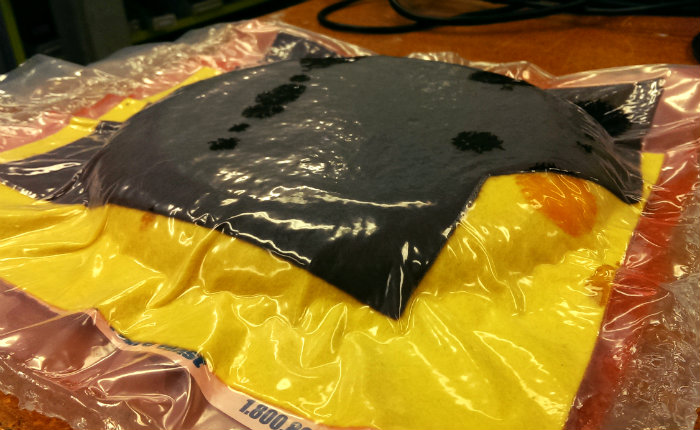
This week I attempted to make a composite frisbee out of cotton and epoxy. I started by tinkercading up a frisbee model. I then used a Shapeoko to mill foam insulating board(the pink stuff form home depot) into my frisbee mold shape. MeshCAM was used to run the machine and I was able to cut at the fastest speed possible because I was using not very dense insulating foam board. Next I cut stips of stiff cotton into small square that could fold around the curves of the frisbee shape. We didn’t have a perforating roller to I used a small screwdriver to perforate my release layers. I then covered the mold with a sheet of release film and tried to apply 3 layers of cotton and epoxy over the entire mold. This was covered by another layer of perforated release film and felt to that vacuum could be pulled on the stack. I used a shopvac to pull vacuum on the stack and then sealed it off with a hot air gun. The kind of worked but ended up leaking over time. I think a proper vacuum bag sealing device would have fixed this problem. The bad didn’t hold vacuum over night but the shape still held pretty well The final object looked ok but was much for flexible then expected, next time I would try using many more layers of fabric. In the end I think I just made a crappy plate that you probably shouldn’t eat off of. Design Files STL of the frisbee can be downloaded...

by Jeffrey Putney | Apr 21, 2015 | Fab Academy
This week my output device was to control an electric strike plate to open a door. The system reads in rfid tags through an RFID scanner and checks the keys against a master list of good keys that are updated my a local server in the room. In order to attach headers to both sides of the board it was necessary to make a two sided board. This worked will in the inner sections but around the edges the copper started to tear away from the board when I pulled it up to flip it over. This caused some pretty rough routing but the board still worked in the end. Here’s a video of it working: Design Files Eagle CAD files can be downloaded here. Arduino code can be downloaded...

by Jeffrey Putney | Apr 14, 2015 | Fab Academy
For this week I created another version of my ATTiny based microcontroller board and added a temperature sensor and light sensor. I also experimented with using a two sided board design to make routing the board much easier. Below is the schematic design with the added components: 365-1157-1-ND Phototransistor 235-1109-1-ND Thermistor (NTC 10kohm) Both of which are simple sensors that change resistance based on their designed input variable(light or temperature). By placing them into a voltage divider network we can easy measure their input level by using the analog read function of our processor. To make a double layer board I decided to use the bottom layer as just be a complete ground plane I didn’t need to actually cut it. I used the Autorouters “Select” tool to select the GND signal and set the layer cost of the Top layer to 99 and the cost of Vias to 50. This cause it to route the signal on the back plane for most of the route. I also enlarged the DRC minimum via size so that I could drill the vias with a 1/32 in bit. After the Ground plane was routed I set the Autorouter back to routing only on the top layer and routed the rest of the board. After milling the board I just had to solder in jumpers through the board at each via hole. I then programmed the board to light up the LED whenever the light level dropped below ambient light levels. Next I very roughly visualized the light level by mapping the light level to some serial port ASCII art for a real...

by Jeffrey Putney | Apr 7, 2015 | Fab Academy
Molding This week I wanted to design a cast a model that would work well for our pewter casting workshops we hold at Makerspace Urbana. I started with the Heartland Maker Fest logo and gave it a grayscale depth profile in illustrator by using the Inner Glow style on the heart path. Here is the 2D Illustrator File and SVG version. This was easy to import into the fab modules as a png file. And from there I could cut a master model out of machinable wax on the Roland Modela using the built in Fab Module setting for “wax rough cut” and “wax finish cut” cut with the 1/8 inch bit. The was used was from machinablewax.com Part# 18-0150307 – blue 1.5″ x 3″ x 7″ Once I had the master model I created soft negative mold using OOMOO 25 Silicone Rubber which has a nice and short 75 min demold time. Once the Oomoo cured it was time to cast the positive model with Smooth Cast 300. The Smooth Cast sets in just 10 min and gets quite hot in the process. The final product looked perfect! Design Files Here is the 2D Illustrator File and SVG...